2013 Bumblebee season begins

It's all been rather quiet for the start of 2013 on our bumblebee project due to our new baby project! We were thrilled to introduce Edan to the world in February, and have been very busy since taking good care of him and feeding him every few hours night and day!

I have to admit that last year's lodge is still needing to be cleaned and I haven't fully decided whether to source a colony for study this year or just rely on trying to encourage natural nesting. The other complexity is that my CCTV monitoring room is now Edan's bedroom and I haven't figured out anywhere suitable for all the CCTV equipment, other than perhaps the garage.

Anyway, it's been a moot point, as the bees themselves have been very slow to emerge after all the cold snowy weather we've been having through February and March. I'm sure there were a few false starts for some of them, but we've only seen our first bufftailed queens in the last week.

This weekend was a turning point for the weather and I was able to get out into the garden to cut and shape the grass (more on that later) and also create some more potential nest sites. It's remarkable to think that this time last year we had 21 new queens itching to leave the nest and yet this year we are only just seeing hibernating queens coming out and looking to set up home.

The other remarkable thing is that today alone I saw 9 queens in the garden looking for a nest site. (At least two were there together, so granted it could be two bees who made 9 visit to the garden in total). This is unprecedented - we are used to seeing 1 every few days. It leads me to wonder whether a) their normal habitat has been destroyed or rendered less suitable or b) whether these are our own queens coming back to where they were born; indeed, most of them explored the area where the nest had been sited on the stones by the garage wall.

Anyway - a quick run down of what I've done to create additional nest environments - since all the bees I've seen are definitely looking at ground level and digging down, I figured I needed to do something different to my above-ground boxes - I.e some underground cavities.

iphone-20130421233718-0.jpg

First, the grass has been cut (or more correctly, left) in strips that lead to the existing boxes. The bumblebees love to search in the long grass for possible burrow holes and explore the linear edges as a guide - so the strips naturally lead the bumbles to the entrances for the existing boxes (which are tubes hidden in moss).

iphone-20130421233718-1.jpg

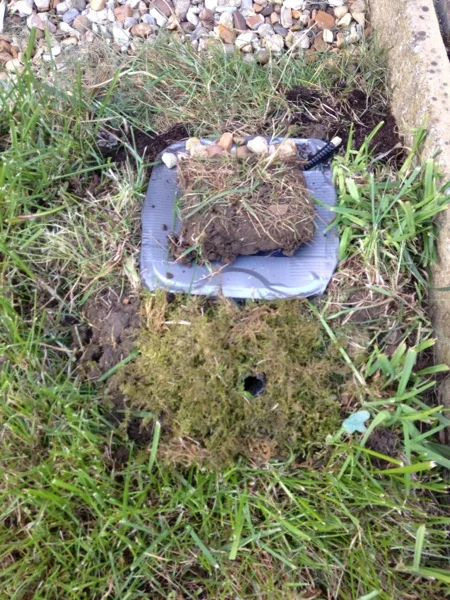
Next, I have created two underground nest sites, inspired by the buried teapot idea. First is a plastic tub, upside down (thus waterproof) with a tube running down into it. The turf on top can be removed for observation if necessary, and I packed some stones and bedding inside. Any bee that chooses to explore that tube is going to find a 5 star residence!

Whilst packing all my tools away after burying the tub I spotted the baby formula tubs we were sending for recycling. I immediately thought that these two would make great underground cavities, being moisture proof and with a handy clippable lid that would also serve well as an observation hatch. So, today I buried one of those, again running a tube into it and packing it with some stones and bedding and moss.
I tried to make the entrances look authentic with some grass cuttings, but will need to let the surrounding lawn grow to encourage searching.

Here's a picture of the two boxes together.

iphone-20130421233718-2.jpg

So, now with underground and on-ground sorted it was time to deal with above-ground. So, I have placed a blue-tit bird box on the fence about a metre above ground - again packing it with bedding material. I've heard numerous folk talk of their blue-tit bird boxes being chosen for bee nests, so I'm hopeful ours will too.

So, looking forward to the next week to see if we get more queens and if they discover what we've laid on for them! :-)


Expanding on the Expanding foam

It was a great day again on Sunday so I took the opportunity to wield the expanding foam again. The plan was to do two things:


  • modify our "triple 3-into-1 tube" set of fake entrances to be covered in moss and look more realistic - with the entrance holes much more vertical standing so they can be seen easily from above. 
  • create an additional nest site from an old poster tube - the idea was to site this amongst the longer grass where the bumblebees have been nest searching, to make it look like a mossy embankment. 


It was all very easy - I've documented the steps in pictures below.

First i made a cardboard base for the "nest tube" and covered it in "bin bag" plastic. The plastic will go face down, to stop the cardboard getting damp and rotting. The top side will be protected by the expanding foam. 


I separated the two ends of tube by packing it with moss and a little hamster bedding. To create a slightly different environment, favoured by different species of bumbles I put a little more bedding in one end and stones in the other. 
contents of one end of the tube
As an extra precaution I fed 10mm tubing into the end of the pipe, to create extra ventilation (and potentially an inspection pathway). 
ventilation & access tube
I stuck the pipe to the base with gaffer tape. As ever I included a thermometer, down into the centre of the tube. Soft drink bottle bases cover the ends. It ended up looking like some kind of crazy bomb. I can assure you it's perfectly safe. ☺
assembled nest tube, with thermometer, before foam is added
Next the fun (and messy bit) - cover the tube in expanding foam. As is started to dry (about 15 minutes) I spray painted it dark brown (mud / earth colour). Looks like a nice cake! ☺
nest tube covered in expanding foam
As it continued to dry, but still a little tacky, I covered in moss, collected earlier in the week. 
moss layer completed
The placed amongst the longer grass. Not sure how I can make it any more real than this, other than actually digging up the lawn! The dark patch on the right hand side is of particular interest. 
final site of nest tube in long grass

Next, the same trick for our "3 into 1" tubing, which goes to a nest box. I made a cardboard wedge from an old box and waterproofed the same way. Note, I poked drain holes along the tubes. 


3-way tube being prepped for foam
Then the foam, as before. The two uppermost pipes are fake.. they are blocked off - just there for additional effect. 
foam added
Again, spray painted brown, then the moss added while tacky.
triple tube, covered in moss..
Here's a view of the two systems in place along the central line we have created down the garden. Bumblebees like to navigate along linear features, often edges (e.g. gravel / grass edge, or crop edge). Our flags and long grass creates the linear feature (and actually shows some signs of working!).
tubes in situ, leading to small nest box
Close up of the 3-into-1 tubes. We are experimenting with one yellow entrance. We do not really expect interest in this, because the Queens tend to think it is a flower, not a hole. But the experiment will see how rigidly they stick to this basic understanding. You can see the nestbox that the tubes lead to. 
close up. 
Finally a view of the entire feature.
full setup - with clear linear featureOur next job will be to simplify the clutter along the left of the picture - the edge is not sufficiently defined and we think the plants (mainly heather) are too close to the nest areas. We'll move them to the cloche area and again try to create a strong linear feature along the lawn edge.
BCW saw 3or 4 queens nest searching in the garden today. They had slightly improved interest in our setup, but not enough to fully explore any of the entrances. We'll get there!

Going Potty

Yet more infrastructure changes this Sunday. Really we are just taking every possible opportunity to create a nesting environment that a queen may explore. 

So, I added some upturned flower-pots (with some tubing underneath) under a mound of cut grass.

You can see I've designed some very obvious "holes" - created by cutting the top of a 2 litre soft drink bottle, feeding the tube into it, and part filling them with the grass. The contrast should make them easy to spot.

Next, I simply just turned one of our blue plastic boxes over and did the same trick with the tube. We've noticed some queens being attracted to the blue (stands to reason, as they are attracted to ultraviolet).


I was also delighted that a load of tubing (off eBay, of course) arrived. This is 3cm diameter"cable tidy" and it will be used simply to keep the CCTV cables tidy and safe (and us inhabitants for that matter). 

I noticed also at dusk just how "fluorescent" our Hi Viz flags were, so just a quick picture of those. No wonder the bumbles are attracted to them!!


Final stage: nestbox tech

It was phase 3 of the "Pilkington box" preparation today: installing the tech!


All our nestboxes and the beepol lodge are fitted with at least one (in some cases two) miniature CCTV cameras. They are small and discreet and have a built in microphone and infrared lighting - which means they can essentially see in the dark. They allow continuous monitoring of activity in the box, including the potential for motion detection. 


The other item to fit is a thermometer - the readout is external to the box, but a wire runs inside the box to sample the temperature. 

spy camera in nest box
Here's a wider view of the finished article. 

This is how the box looks located at its final site against our garage wall. The red filter is effective at allowing a view inside the nest without creating disturbance to any resdents. I haven't decided where to mount the thermometer yet. 

installation site for pilkington box

Next is the series of entrance tubes we have fitted. We have three boxes and five tubes. The idea of the tubes is to create a more natural looking entrance and also trick the bumblebees into thinking they are going underground - which of course is especially important for Bombus Terrestris (Bufftailed). 

We have tried to make the tubes look like holes in the undergrowth so that the bumbles we see them easily when scanning the garden for nest sites (of which we've seen several doing). 
entrance tube 1

Entrance tube 1 is for the left hand box. The coloured marking is to attract attention - we have noticed that the high-visibility tape is very successful at attracting bumbles. It would also provide an easier landmark to memorise should a queen check the box out and want to come back later. There is a small amount of old used mouse bedding in the entrance to create an aroma that is also appealing.

entrance tube 2

Entrance tube 2 is for the Pilkington box. This one is facing more directly upward so that it's more easily seen from a height. 

entrance tube 3a
There are three entrance "3's" - left (a), centre (b) and right (c) - as they are all connected to the right hand nestbox. This helps us try a few different designs of entrance. 
entrance tube 3b
entrance tube 3c

Finally, here is the full setup of nestboxes against our garage wall. We've trimmed the nearby grass to make the entrance tubes stand our more easily, but left some grass uncut so that the bumblebees are attracted into the garden in the first place to look for a possible nest site: they do seem to like searching over the uncut grass on the lawn.


We also have some "fake flowers" made of the yellow tape & canes to attract attention (not shown). We've seen several queens now flying from one to the other figuring out what they are. We've created a row that leads them down to the entrance tubes. We'll experiment with this to see what effect different arrangements have and whether it has any effect on queens looking for nests, or whether they don't combine forgaging behaviour with nest searching. 

the full nestbox setup with 3 boxes
We have lots of plants not shown in the picture which are now in bloom, including a Kilmarnock Pussy Willow, which seems to be very popular! But round the boxes we've put white and purple heather - the bumbles are very attracted to purple. 
So, aside from having some low-level radar ☺,  we have a pretty good setup to try and study the garden nest searching behaviour.

Thru-Tube

Although deceptively bright, it was very chilly outside today (about 8C max) and raining on and off - so we didn't expect much bumble activity. So, I planned to complete some infrastructure changes instead.
This consisted of abandoning our "cloche" nest site following the death of QB2012-02 for a new strategy (we'll use it for growing tomatoes, peppers and strawberries - the bees will love that ☺). The new strategy is to relocate the nest box along our garage wall and create a tube system to provide entrance holes amongst tufts in the lawn. Indeed, we saw 3 brave bumbles around the house and garden today looking for rest / nest sites. 
One big bufftailed Queen surprised us by doing a grand tour of the exterior of the house - check along all the walls, even windows on the top storey. It's encouraging that they will extend their search to man made locations, but what we need to do is figure out what is actually appealing to them. More is known about the natural environments they choose and how to mimic those environmens with a nest box (see the rest of this post). But less is known about how to do the same for manmade features.

Building a tube system

In order to maximise chances of a queen discovering and entering our nestboxes, I wanted to increase the number of entrance points available in the garden. This would also allow us to try different disguise/visbility strategies on the entrace to see which ones the bees favour. 
I built a tube "connector" which allows 3 incoming tubes to meet in a box, and then exit in one direction towards the nest box. When the bumblebee is in the dark tube, it is is tricked into thinking it is heading underground into our lovely warm, dry nest chamber. Total length of the tubes from one entrance to the exit into the box is about 80cm - a distance that Bombus Terrestris should be comfortable navigating to get "underground" (indeed, they should be delighted with it). 
entrance tube connecting systemThe construction is self-explanatory.
Next I filled the remainder of the box with packing material. This is just a precautionary measure to ensure there is no big cavity in the box: we don't want bumble stopping and setting up nest in this box! (There is no easy access into it anyway - it's an additional precaution). 
filled with packing to ensure there is no cavity
Then I taped and sealed the system to make it waterproof and installed it outside. 
revised nestbox site setup with "triple entrance" systemAbove you can see both our nestboxes with their entrance set ups. The box on the left is completely buried under the expanding foam shelter and the entrance tube extends out to the lawn, just bottom left of the heather by the leftmost high-viz cane. 
The box on the right is as yet unprotected (next job!) and the tube extends to the splitter box just behind the potted grasses on the right. The 3 tubes extend as follows:
  1. left of the 2nd heather in from the right
  2. between the 2 grass pots on the right
  3. to the right of the rightmost heather pot
Here's a close "bee's eye" view:
bee's eye view of entrance holes
Note that we are trialling different marking arrangements - does a high visibility marking improve or decrease atttractiveness? 
entrance on our second nestboxFor completeness, above is the entrance hole to our left-hand nest box. Surely a queen would spot this and want to explore it! 

Queen Capture

We are developing revised tactics for the capture of queens so that they are less stressed and more inclined to explore and stay in the nest boxes. To that end, instead of using jars to capture them, we have built these tubes (kindly suggested by George Pilkington) that can be placed over the queen while she is exploring a hole in the ground/undergrowth. It is totally dark, which will keep her calm, and while she is in it, she is more likely to think she is still underground. Then we can carefully bring her back to the nestbox and introduce her with much less trauma. 
The red window allows us an additional check to see she has climbed into the tube - bumblebees do not see deep red light.
bumblebee queen capture tubes 
We are looking forward to trying this once the weather picks up!